
Spooky Halloween Cauldron Cookies: Easy & Delicious Treat Recipe
Introduction
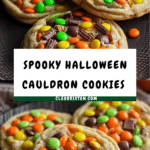
These Spooky Halloween Cauldron Cookies are a fun and festive treat, perfect for celebrating the spooky season. Crisp, buttery cookies decorated with colorful royal icing and creepy candy details make them a delightful hit at any Halloween party.
Ingredients
- 1 cup unsalted butter, softened
- 1 cup granulated sugar
- 1 cup brown sugar, packed
- 2 large eggs
- 2 tsp vanilla extract
- 3 cups all-purpose flour
- 1 tsp baking soda
- 1/2 tsp salt
- 1 cup chocolate chips
- 1 cup candy corn
- 4 cups powdered sugar, sifted (for royal icing)
- 3 tbsp meringue powder (for royal icing)
- 1/2 tsp vanilla extract (for royal icing)
- 6-8 tbsp warm water (for royal icing)
- Green or purple gel food coloring (for icing)
- Black gel food coloring (for icing)
- Assorted Halloween sprinkles
- Edible candy eyeballs
- Miniature candy bones or skulls
- Edible glitter (optional)
Instructions
- Step 1: In a bowl, whisk together the flour, baking soda, and salt. In a stand mixer, cream the softened butter with granulated sugar and brown sugar until fluffy, about 3 to 5 minutes. Beat in eggs one at a time, then add vanilla extract. Gradually add the dry ingredients, mixing until just combined. Fold in chocolate chips and candy corn. Shape the dough into a disc, wrap it, and refrigerate for at least 1 to 2 hours.
- Step 2: Preheat the oven to 375°F (190°C) and line baking sheets with parchment paper. Lightly flour a surface and rolling pin. Roll half of the chilled dough to about ¼ inch thickness. Use a cauldron-shaped cookie cutter to cut out shapes and place them on the baking sheets. Re-roll scraps gently and repeat. Bake for 8 to 11 minutes until edges are lightly golden. Let cookies cool on the baking sheets for 5 minutes, then transfer to a wire rack to cool completely. Make sure cookies are fully cool before decorating.
- Step 3: To prepare royal icing, combine sifted powdered sugar and meringue powder in a stand mixer. Add vanilla extract and 6 tablespoons warm water. Beat on medium-high speed for 5 to 7 minutes until the icing is thick, glossy, and forms stiff peaks. Adjust the consistency with warm water as needed: thicker for outlining (15-20 second ribbon test) and thinner for flooding (8-10 second ribbon test). Divide the icing, coloring one portion black for outlining and the largest portion green or purple for flooding the “brew.”
- Step 4: Fill piping bags fitted with small round tips with black outline icing and colored flood icing. Carefully pipe a black outline around each cauldron cookie, including the rim and handles. Allow the outline to set for 10 to 15 minutes. Then flood the inside of the cauldron with the green or purple icing, using a toothpick to spread to the edges. While the flood icing is still wet, add dots of white or lighter green icing for bubbles and gently swirl. Let the decorated cookies dry completely for 6 to 12 hours or overnight.
- Step 5: After the icing is fully dry, use small dabs of royal icing to attach edible candy eyeballs, miniature candy bones, or skulls onto the “brew.” Optionally, scatter Halloween sprinkles over the wet flood icing, or brush edible glitter on dried icing for shimmer. Use black outline icing for details like spiders or steam if desired. Make sure all decorations are dry before storing.
- Step 6: Store the cookies in an airtight container at room temperature for up to 2 weeks, layering them with parchment paper to prevent sticking. Avoid refrigerating the cookies. Serve on a festive platter for a spooky and delicious Halloween treat!
Tips & Variations
- For a gluten-free version, substitute the all-purpose flour with a gluten-free baking blend of equal measure.
- Try different gel food coloring shades like neon orange or blue for a unique cauldron “brew.”
- If you don’t have a cauldron cutter, use a circle cutter and decorate with icing to mimic a cauldron shape.
- Add a bit of cinnamon or pumpkin pie spice to the dough for a warm autumn flavor twist.
Storage
Store fully decorated and dry cookies in an airtight container at room temperature for up to two weeks. To prevent them from sticking, place parchment paper between layers. Avoid refrigeration as it can soften the royal icing. If needed, reheat slightly by bringing to room temperature after chilling.
How to Serve

Serve this delicious recipe with your favorite sides.
FAQs
Can I use regular egg whites instead of meringue powder for the royal icing?
While fresh egg whites can be used, meringue powder is recommended for safety and convenience, especially for decorating cookies that will not be baked again. It ensures a stable and safe royal icing.
How do I make sure the royal icing sets properly?
Allow plenty of drying time—ideally 6 to 12 hours or overnight—in a cool, dry place. Avoid humidity which can prevent the icing from hardening fully. Using the correct consistency for outlining and flooding also helps the icing set smoothly.
Print
Spooky Halloween Cauldron Cookies: Easy & Delicious Treat Recipe
- Total Time: 2 hours 30 minutes (including chilling and drying time)
- Yield: Approximately 24–30 cookies depending on cutter size 1x
Description
These Spooky Halloween Cauldron Cookies combine festive fun with delicious flavors. Soft, chewy cookies studded with chocolate chips and candy corn are decorated with vibrant royal icing in eerie greens and purples, outlined in black, and garnished with creepy edible candy eyeballs, bones, and sprinkles for a creepy-cute treat perfect for Halloween parties and gatherings.
Ingredients
Cookie Dough
- 1 cup unsalted butter, softened
- 1 cup granulated sugar
- 1 cup brown sugar, packed
- 2 large eggs
- 2 tsp vanilla extract
- 3 cups all-purpose flour
- 1 tsp baking soda
- 1/2 tsp salt
- 1 cup chocolate chips
- 1 cup candy corn
Royal Icing
- 4 cups powdered sugar, sifted
- 3 tbsp meringue powder
- 1/2 tsp vanilla extract
- 6–8 tbsp warm water
- Green or purple gel food coloring
- Black gel food coloring
Decorations
- Assorted Halloween sprinkles
- Edible candy eyeballs
- Miniature candy bones or skulls
- Edible glitter (optional)
Instructions
- Prepare Cookie Dough Base: In a bowl, whisk together the flour, baking soda, and salt. In a stand mixer, cream softened butter with granulated sugar and brown sugar until fluffy, about 3-5 minutes. Beat in eggs one at a time, then add vanilla extract. Gradually mix in the dry ingredients until just combined. Fold in chocolate chips and candy corn. Shape dough into a disc, wrap tightly, and refrigerate for at least 1-2 hours.
- Shape and Bake Cookies: Preheat your oven to 375°F (190°C) and line baking sheets with parchment paper. On a lightly floured surface, roll half of the chilled dough to about 1/4 inch thickness. Use a cauldron-shaped cookie cutter to cut out shapes and place on the baking sheets, re-rolling scraps to cut more shapes. Bake for 8-11 minutes until edges are lightly golden. Let cookies cool on the baking sheets for 5 minutes before transferring them to a wire rack to cool completely.
- Prepare Royal Icing: In a stand mixer, combine sifted powdered sugar and meringue powder. Add vanilla extract and warm water. Beat on medium-high speed for 5-7 minutes until the mixture is thick, glossy, and forms stiff peaks. Adjust the consistency by adding warm water: thick for outlines (15-20 seconds ribbon test) and thinner for flooding (8-10 seconds ribbon test). Divide the icing, coloring one portion black for outlining, and the largest portion green or purple for flooding the cauldron.
- Outline and Flood Cookies: Fill piping bags with black icing for outlines and colored icing for flooding, using small round tips. Pipe a black outline around each cauldron cookie including rims and handles. Allow the outline to set for 10-15 minutes. Then fill the inside with the colored flood icing, spreading it out to the edges using a toothpick. Add small dots of white or lighter-colored icing for bubbles while the flood icing is still wet and swirl gently. Let the icing dry completely for 6-12 hours or overnight.
- Add Spooky Decorations: Once the royal icing is dry, attach edible candy eyeballs, miniature candy bones, or skulls onto the ‘brew’ using a small dab of royal icing as glue. Optionally, scatter Halloween sprinkles on the wet flood icing or brush edible glitter on the dried icing for a shimmer effect. Use black outline icing for additional fine details such as spiders or steam. Make sure all decorations are completely dry before handling or storing.
- Store and Serve: Store the completely dry decorated cookies in an airtight container at room temperature for up to two weeks, layering sheets of parchment paper between them to prevent sticking. Avoid refrigeration to keep the icing intact. Serve on a festive platter to wow your Halloween guests!
Notes
- Chilling the dough is essential for handling and helps the cookies maintain shape during baking.
- Ensure cookies are fully cooled before applying icing to prevent melting and color bleeding.
- Adjust royal icing consistency carefully for perfect outlining and flooding results.
- Allow sufficient drying time for royal icing, preferably overnight, for best decoration stability.
- Store cookies at room temperature; refrigeration can cause icing to crack or sweat.
- Use gel food coloring for vibrant colors without thinning the icing.
- Prep Time: 20 minutes (plus 1-2 hours chilling time)
- Cook Time: 8-11 minutes per batch
- Category: Dessert
- Method: Baking
- Cuisine: American
Keywords: Halloween cookies, cauldron cookies, royal icing cookies, spooky treats, candy corn cookies, Halloween dessert, decorated sugar cookies


